


12.
RAD Designs and Layouts
This chapter helps you understand the major features of CodeWarrior's rapid application development (RAD) tools. You can also learn about the motivations for RAD development, as well as the concepts of designs and layouts in CodeWarrior projects.
The sections in this chapter are:
About RAD

Traditional application programming requires tedious and manual work. When you create a new application, you are responsible for coding every aspect of the program. You must specify all initialization routines, the interactions between the various pieces of the program, and the user interface.
RAD tools automate some of these manual processes, so you can concentrate your efforts on the application itself. The tools automatically generate code that handles generic initialization routines and the drawing of user interface elements on the screen. In addition, you can modify the generated code to suit your application's specific needs.
CodeWarrior includes RAD tools as part of the development environment. These tools support the development of applications, applets, and components through a plug-in architecture. You can use existing RAD plug-ins with the IDE, or you can create your own. This flexibility supports multiple languages, platforms, and application frameworks.
CodeWarrior RAD Tools

CodeWarrior RAD tools let you visually construct an application. The tools included with the IDE are for use with Java. They extend the graphical capabilities of the IDE for use with RAD. Additional programming frameworks will be supported in the future.
This section discusses the following topics:
Class Authoring

RAD tools let you create and modify classes through a high-level visual interface. You can use this interface to create, rename, and delete the various classes, member functions, and data members in your application. The RAD tools automatically synchronize declarations and definitions as you modify the application.
Because CodeWarrior uses a plug-in architecture for RAD, you can easily extend the IDE's capabilities. The RAD tools automatically generate source code via scripts. You can modify existing scripts to customize the generated code for your application.
Component Model

CodeWarrior RAD tools use a component model to create applications. A component in RAD context is a self-describing object. The component represents an object in the programming framework you use to create an application. All of the properties, methods, and events that describe an object are included in the component.
Components enable a powerful and intuitive user interface for applications across a wide variety of platforms. RAD tools use these components to provide several services, including persistence and automation.
CodeWarrior uses these tools to implement the component model:
Layout Editor
One major part of the RAD tools is the Layout editor. This application builder uses a visual development environment. User interface elements are visually represented as components. You can drag and drop components to form your application. As you make changes, the IDE updates the Layout editor display and modifies the generated source code accordingly.
Catalogs
Catalogs comprise the second major part of the RAD tools. Catalogs are repositories of available components for the application. The IDE provides catalogs based on the programming framework you use. For example, when you create a Java application, you can choose components from Java-specific catalogs. The properties and events of the components in a catalog are fully customizable.
Creating RAD Projects

To create a CodeWarrior RAD project, choose New from the File menu. The IDE displays the New window, as shown in Figure 12.1.
Click the Project tab at the top of the window to display the Project panel. This panel shows the available stationery and wizards that you can use to create new CodeWarrior projects. When you select an item in the list, various options become available along the right side of the Project panel.
Figure 12.1 New dialog box
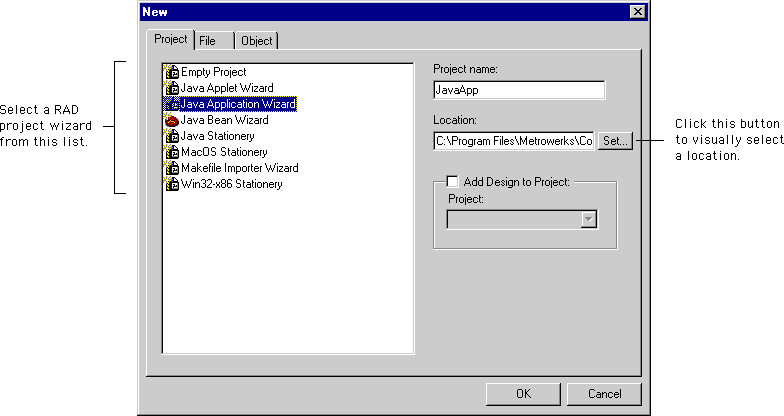
To create a new RAD project, select one of the following wizards in the project list:
-
Java Applet Wizard-helps you create a Java applet. The wizard asks for information about the applet's class, HTML page, parameters, and description.
-
Java Application Wizard-helps you create a Java application. The wizard asks for information about the application's class, frame class, and description.
-
Java Bean Wizard-helps you create a Java bean. The wizard asks you for information about the bean's class, location, package, and modifiers.
After you select a project wizard, type a name for your new project in the Project name field.
 TIP
TIP
We suggest naming your project file with a .mcp file name extension, like this: MyProject.mcp. This naming convention helps you quickly identify the project file on your hard disk. In addition, the Windows-hosted version of the CodeWarrior IDE uses this extension to identify the project file.
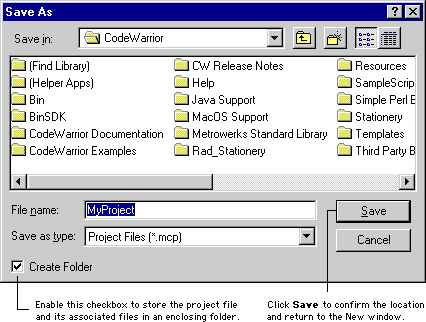
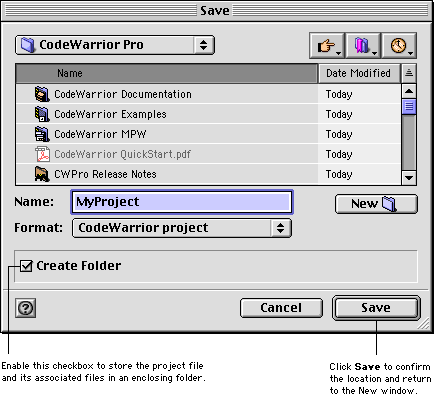
The Location field displays the full path to the folder in which the project is saved. To change the current path, type a new path directly into the field. Alternatively, click the Set button to the right of the field to display a dialog box, which is shown in Figure 12.2 (Windows) and Figure 12.3 (Mac OS). Use the dialog box controls to navigate to a location on your hard disk where you want to save the project. To create a new folder to contain the project file and all of its associated files, make sure the Create Folder checkbox is enabled. Then click Save to confirm the location and return to the New window.
Figure 12.2 Save dialog box (Windows)
 WARNING!
If you try to save the new project, and you already have an existing project with the same name in the same location on the hard disk, the IDE displays an error message. Be sure to use a unique name for your new project.
When you finish typing a name for the RAD project and choosing a location in which to save that project, click OK in the New window. The IDE opens the wizard you selected in the Project panel. The selected wizard guides you through the remaining steps of the project-creation process. For detailed information about each wizard, see "RAD Wizards" on page 498.
Figure 12.3 Save dialog box (Mac OS)
RAD Wizards

When creating a new RAD project or design, as described in "Creating RAD Projects" on page 495 and "Adding Designs to a Project" on page 513, you select a RAD wizard. The wizard helps you complete the item-creation process. This section describes the following RAD wizards:
For beginners
Each wizard assumes you have a basic understanding of the associated programming language. For example, if you use the Java Application wizard, you should understand the difference between an Abstract Window Toolkit (AWT) frame and a Swing frame. If the items displayed in the wizard are unfamiliar, you should consult additional programming language references for more information.
The RAD wizards include the following navigation buttons:
Each wizard is divided into a series of steps. You progress through these steps in sequence, and each step builds on the information provided in previous steps. When you supply enough information in a particular step, click Next to continue.
You can modify the default settings in each step. To accept all current settings in the wizard, click Finish. The wizard displays a summary of all the current settings for the new project. Click Generate to accept the current settings and create the new RAD item, or click Cancel to return to the wizard and continue modifying settings.
Java Applet Wizard

The Java Applet wizard is divided into the following steps:
1. Describe the applet class for the Java applet.
2. Specify an HTML page for the Java applet. (optional)
3. Create parameters for the Java applet.
4. Provide additional information for the Java applet.
To use the Java Applet wizard, follow these steps:
1. Describe the applet class for the Java applet.
This section of the wizard, shown in Figure 12.4, lets you specify the class name, package name, and location for the new applet. Other options are available to further describe the applet.
Figure 12.4 Java Applet wizard - Applet Class
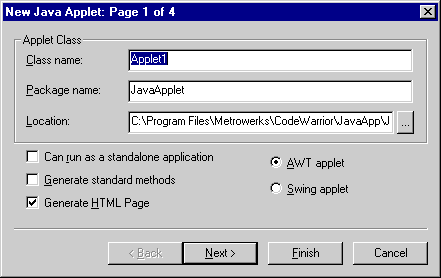
This section includes the following parts:
Class Name
Enter a name for the applet's class in this field. An example name is provided.
Package Name
If you wish, you can enter in this field a package for the applet class. A sample package name is provided.
Location
In this field, type a location in which to save the applet class for the new applet. Alternatively, click the button next to the field. A standard window displays. Use the window controls to select a location. Note that a valid location depends on your settings for strict filenames and strict package roots.
Can run as a standalone application
Enable this checkbox if you want the new applet to operate without needing to be called from another application. Disable this checkbox otherwise.
Generate standard methods
Enable this checkbox if you want the new applet to generate standard methods for its interface, such as show() and dispose(). Disable this checkbox otherwise.
Generate HTML Page
Enable this checkbox if you want to create an HTML page to help you test the new applet. Disable this checkbox otherwise. Note that the Java Applet wizard displays the HTML Page section only when you enable the Generate HTML Page checkbox. This checkbox is enabled by default.
AWT applet
Click this radio button to designate the new applet as an AWT applet. This radio button is enabled by default.
Swing applet
Click this radio button to designate the new applet as a Swing applet.
2. Specify an HTML page for the Java applet. (optional)
This section of the wizard, shown in Figure 12.5, is displayed only when you enable the Generate HTML Page checkbox from the previous section. The HTML Page section lets you define a Hypertext Markup Language (HTML) page to test the new applet.
Figure 12.5 Java Applet wizard - HTML Page
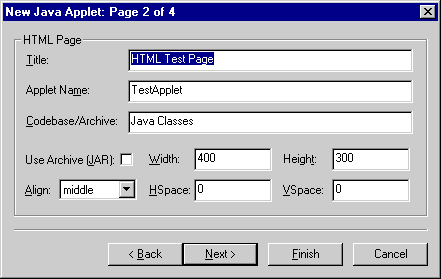
This section includes the following parts:
Title
Enter in this field a title for the HTML page you wish to generate. An example title is provided.
Applet Name
Your HTML browser displays messages about the applet by using the name you type in this field. A sample applet name is shown.
Codebase/Archive
If desired, use this field to specify a codebase or archive for use with the new applet. An example is shown.
Use Archive (JAR)
Enable this checkbox if you want to use a Java archive (JAR) with the new applet. If this checkbox is enabled, a ".jar" extension is appended to the name in the Codebase/Archive field.
Width
The number you type in this field represents the number of pixels that span the width of the applet within the HTML page.
Height
The number typed in this field specifies the number of pixels that span the height of the applet within the HTML page.
HSpace
The number in this field defines the number of pixels placed on the left side and on the right side of the applet within the HTML page.
VSpace
The number in this field defines the number of pixels placed above and below the applet within the HTML page.
Align
Use this pop-up menu to determine the alignment of the applet within the HTML page:
This section of the wizard, shown in Figure 12.6, lets you create a set of parameters for the new applet. Each parameter has the following fields:
Name-the name of the parameter
Type-the data type of the parameter
Default-the default value for the parameter
Variable-the variable that represents the parameter
Description-a short description of the parameter
Figure 12.6 Java Applet wizard - Applet Parameters
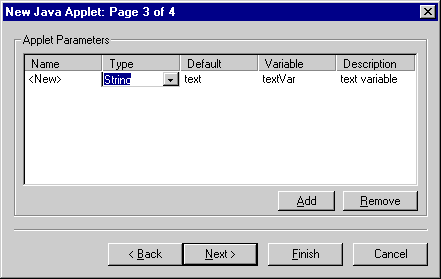
A sample <New> parameter is ready for you to modify. To change a particular field, double-click it. Type a new value in the field and press Enter/Return to confirm your changes.
If you double-click the Type field, choose a new value from the pop-up menu that displays inside the field. Alternatively, if you know which data type you would like to choose beforehand, you can use a shortcut. Simply double-click the Type field and type the first letter of your desired data type. The field displays a new value. If an incorrect value displays, type the same letter again to choose the next closest match. For example, if you double-click the field and type the letter s, the field changes to String. Typing the letter s again changes the field to short.
To add another parameter to the applet, click Add. The wizard creates a new parameter for you to modify. To remove a particular parameter, select one of its fields and click Remove.
4. Provide additional information for the Java applet.
This section of the wizard, shown in Figure 12.7, lets you provide additional information to describe the applet.
This section includes the following parts:
Figure 12.7 Java Applet wizard - Information
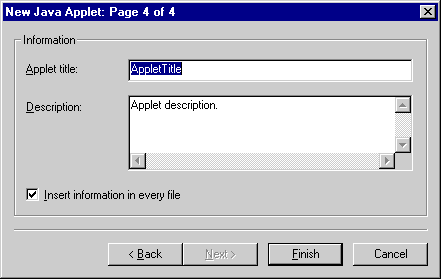
Applet title
If desired, enter a title for the new applet in this field.
Description
If you wish, type a description for the new applet in this field.
Insert information in every file
To add the information contained in the Applet title and Description fields to the beginning of every applet file, enable this checkbox. Disable the checkbox otherwise. The checkbox is enabled by default.
Java Application Wizard

The Java Application wizard is divided into the following steps:
1. Describe the application class for the Java application.
2. Describe the frame class for the Java application.
3. Provide additional information for the Java application.
To use the Java Application wizard, follow these steps:
1. Describe the application class for the Java application.
This section of the wizard, shown in Figure 12.8, lets you specify application class information for the Java application.
This section includes the following parts:
Class Name
Enter a name for the application's class in this field. An example name is provided.
Figure 12.8 Java Application wizard - Application Class
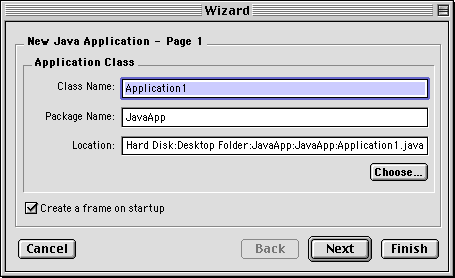
Package Name
If you wish, you can enter in this field a package for the application class. A sample package name is provided.
Location
In this field, type a location in which to save the application class for the new application. Alternatively, click the button next to the field. A standard window displays. Use the window controls to select a location.
Create a frame on startup
Enable this checkbox if you want the IDE to automatically generate a new layout frame. This option automatically displays the Layout Editor, Component Palette, and Object Inspector. Disable the checkbox if you do not want to automatically display these tools.
2. Describe the frame class for the Java application.
This section of the wizard, shown in Figure 12.9, lets you specify frame class information for the Java application.
This section includes the following parts:
Class Name
Enter a name for the frame's class in this field. An example name is provided.
Figure 12.9 Java Application wizard - Frame Class
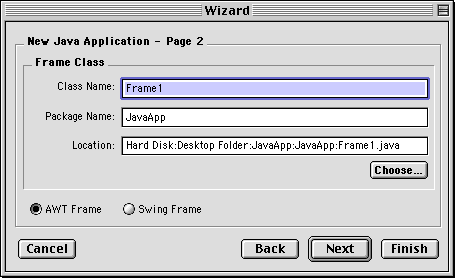
Package Name
If you wish, you can enter in this field a package for the frame class. A sample package name is provided.
Location
In this field, type a location in which to save the frame class for the new application. Alternatively, click the button next to the field. A standard window displays. Use the window controls to select a location. Note that a valid location depends on your settings for strict filenames and strict package roots.
AWT frame
Click this radio button to designate the new application as an AWT frame. This radio button enabled by default.
Swing frame
Click this radio button to designate the new application as a Swing frame.
3. Provide additional information for the Java application.
This section of the wizard, shown in Figure 12.10, lets you provide additional information to describe the application.
This section includes the following parts:
Application title
If desired, enter a title for the new application in this field.
Figure 12.10 Java Application wizard - Information
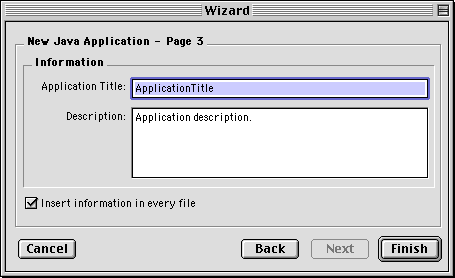
Description
If you wish, type a description for the new application in this field.
Insert information in every file
To add the information contained in the Application title and Description fields to the beginning of every application file, enable this checkbox. Disable the checkbox otherwise. The checkbox is enabled by default.
Java Bean Wizard

The Java Bean wizard is divided into the following steps:
1. Choose a name and location for the Java bean.
2. Specify a base class and a list of implementations.
To use the Java Bean wizard, follow these steps:
1. Choose a name and location for the Java bean.
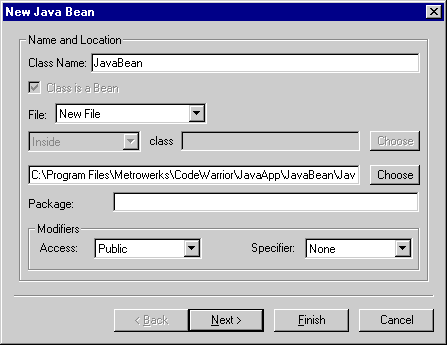
This section of the wizard, shown in Figure 12.11, lets you specify the name and location of the new bean, as well as the modifiers for the bean.
This section includes the following parts:
Class Name
Enter a name for the bean's class in this field. An example is provided below the field. The Class is a Bean checkbox below the field remains enabled. This status indicates that you are creating a Java bean.
 NOTE
NOTE
If you want the applet to be compatible with other development tools, the class name should match the applet's file name.
Figure 12.11 Java Bean wizard - Name and Location
File
This pop-up menu indicates that you are creating a New File. No additional options are available.
Type the path to which you want to save the file in the field above the Package field, as shown in Figure 12.11 on page 511. Alternatively, click Choose next to the field. A window opens that lets you browse your computer's contents. Use the window controls to select the location to which you want to save the file.
Package
If you wish, you can enter in this field a package for the bean.
 NOTE
NOTE
If you want the applet to be compatible with other development tools, the file path and package path should match.
Modifiers
Use the Specifier pop-up menu to choose the method specifier for the new bean. Possible specifiers include None, Abstract, and Final. The Access pop-up menu in this section indicates that you are creating a bean with Public access. No additional options are available for this pop-up menu.
2. Specify a base class and a list of implementations.
This section of the wizard, shown in Figure 12.12, lets you specify the base class and implementations for the new bean.
Figure 12.12 Java Bean wizard - Base Class and Interfaces
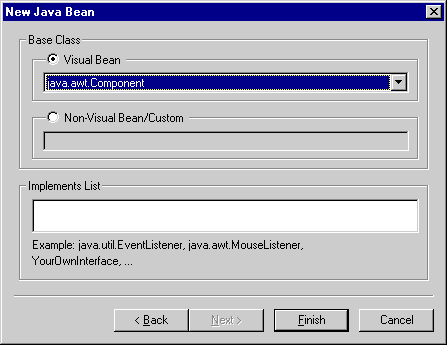
This section includes the following parts:
Base Class
The settings in this part determine the base-class type of the new bean. There are two possibilities:
Implements List
In this part, type a list of interfaces to be implemented by the base class. Example interfaces are provided. Separate multiple interfaces with commas.
Working with Designs

The IDE uses designs to organize and manage RAD projects. A design includes a particular set of user interface layouts and components that are part of the application. A CodeWarrior project can include several designs. Each design can include several build targets.
This section discusses the following topics:
Adding Designs to a Project

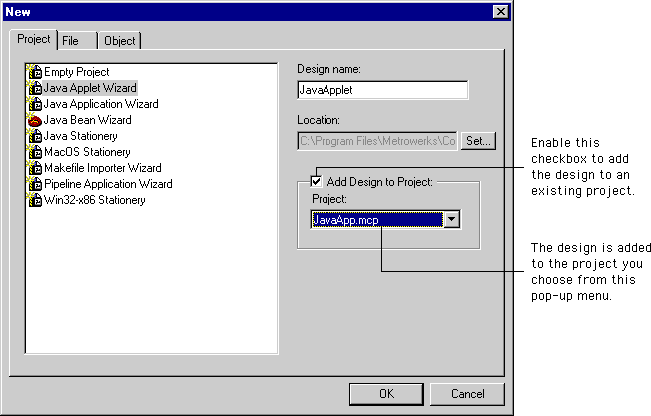
To add a design to an open project in the IDE, choose New from the File menu. The IDE displays the New window, shown in Figure 12.13. Click the Project tab at the top of the window to display a list of available wizards.
Figure 12.13 Adding a design to a project
The wizards you use to create designs are the same wizards you use to create projects:
-
Java Applet Wizard-helps you create a Java applet. The wizard asks for information about the applet's class, HTML page, parameters, and description.
-
Java Application Wizard-helps you create a Java application. The wizard asks for information about the application's class, frame class, and description.
-
Java Bean Wizard-helps you create a Java bean. The wizard asks you for information about the bean's class, location, package, and modifiers.
For example, if you want to create a Java applet design, select the Java Applet Wizard.
To add the new design to the project, enable the Add Design to Project checkbox. Because you are adding the design to an existing project rather than creating a new project, the Location field grays out, as shown in Figure 12.13. Type a name for the new design in the Design Name field.
Select the project's name from the Project pop-up menu, as shown in Figure 12.13. The design is added to the project you choose from this pop-up menu.
After you click OK, the selected wizard opens and guides you through the design-creation process. See "RAD Wizards" on page 498 for more information about each wizard. When you complete the wizard, the IDE adds the design to the project.
Each RAD project can have multiple designs. However, a single project file can have at most 255 build targets. Because each design can have several build targets, you should keep this limit in mind as you add designs to your project. Many of the suggestions in "Strategy for Creating Complex Projects" on page 94 apply when creating multiple designs for a single RAD project.
Figure 12.14 Design view in Project window

Design View in the Project Window

When you create a RAD project, click the Design tab in the Project window to display the Design view. This view, shown in Figure 12.14, provides information about the design for the active build target. For example, Figure 12.14 shows the design for the Java Application build target. To view another build target's design, select that build target's name from the Current Target pop-up menu.
Some of the objects displayed in the Design view are hierarchical. Click the hierarchical control next to an object to expand that object and view its contents. Click the control again to collapse the view.
Designs in the Targets View

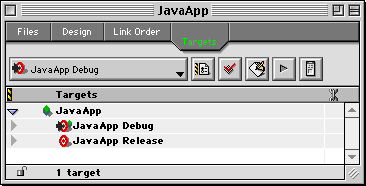
Click the Targets tab in the Project window to view the hierarchy of build targets within each design, as shown in Figure 12.15. A build target's icon includes a design badge ( ) when it is part of the current design. For example, the JavaApp Debug build target in Figure 12.15 is part of the current design because its icon includes the design badge. Since the JavaApp Release build target is not part of the current design, its icon does not include the design badge.
Figure 12.15 Designs in the Targets view
Working with Layouts

Each RAD project can include multiple layouts. A layout is a collection of user interface elements that comprise an application. A specific layout describes the content of a window, dialog box, or alert. Additionally, a layout describes the content of all the possible views in a particular window when you perform various actions.
The IDE features a Layout editor that displays each layout in your project. The Layout editor uses the IDE's plug-in architecture to display the user interface. For example, when you create a Java RAD project, the IDE uses the Java RAD plug-in to display the user interface in the Layout editor. Figure 12.16 shows a sample layout.
Figure 12.16 A layout in the Layout editor

The Layout editor works in conjunction with the catalogs to build an application. All of the available components for your RAD project are managed by catalogs. The Component Palette and the Component Catalog window let you view and use the contents of these catalogs. When you add a new interface element to the layout, you can drag a component from the Component Catalog window and drop that component into the layout. You can also select the same component from the Component Palette, which is shown in Figure 12.17.
Figure 12.17 Component Palette

To learn how to create layouts and use the Layout editor, see "RAD Layout Editing" on page 519.
"Component Palette" on page 528 and "Component Catalog window" on page 532 describe the two catalog tools you use with the Layout editor.
"RAD Components" on page 549 describes the individual components inside the catalogs included with CodeWarrior.


Visit the Metrowerks website at: http://www.metrowerks.com
For assistance contact Metrowerks Technical Support at: support@metrowerks.com
Copyright © 1999, Metrowerks Corp. All rights reserved.
Last updated: May 24, 1999


 TIP
TIP

 WARNING!


 NOTE
NOTE

 NOTE
NOTE


 ) when it is part of the current design. For example, the JavaApp Debug build target in Figure 12.15 is part of the current design because its icon includes the design badge. Since the JavaApp Release build target is not part of the current design, its icon does not include the design badge.


